 (Originally published as a blog post for Merion Art) Like many people, I was first introduced to oil pastels in elementary school art class, in the form of CrayPas. As an adult, I can still count the number of oil pastel artists I’ve met on one hand. When I show my artwork, people often have a hard time identifying the medium, and when I tell them, they’re still surprised. Often, they’ll say: “Oil pastels? I’ve thought about trying those, but aren’t they really hard to use?” or “Oil Pastels? Aren’t those only for kids?” If I had a dollar for every time I’ve answered those questions, I’d have a lucrative silly-response side-hustle going. Oil pastels are easy to use, and they’re not just for kids. Yes, there’s a learning curve- a drawing done in oil pastel usually needs a little development to look good, and that can scare people away. But there are huge benefits to using oil pastels. Oil pastels are cheap, easy to clean, easy to transport, easy to control, and perfect for artists of all ages and skill levels. Their particular composition and versatility allows for amazing effects, gorgeous textures, subtle gradients, and luminous saturated color. 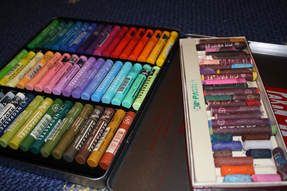 Why You Should Try Oil Pastels Unlike oil painting, an oil pastel can be done quickly, with very little mess and next to no accessories (oils, solvents, etc.) and doesn’t require dry time. This makes them great for travel or plein-air. Oil pastels start out very cheap– and even if you’re a professional, you can use cheaper brands for underpainting and save your expensive sticks for top layers and fine details. Oil pastels are extremely versatile:
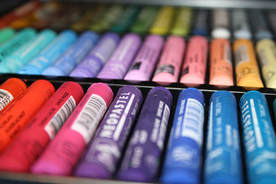
Oil Pastel Quality: Crayons to Lipstick Oil pastels are some of the cheapest… and also most expensive art supplies around. Confused? It all has to do with quality. The lowest quality pastels can cost around $2.25 for a box of 12 colors, highest quality pastels cost more like $6 per stick. Price is probably the easiest way to tell which pastels are better quality. “Threshold of quality” is a phrase I use to describe the point at which you notice the quality of the art material you are using. Different art materials have different thresholds of quality. For instance, graphite sketch pencils have a high threshold of quality- you’d have to be using them A LOT to notice “Ooh, this is an expensive, good quality pencil”. Acrylic paint has a middling threshold- an amateur craft painter can tell the difference between plastic-y, watery cheapo acrylic and nice heavy body artist quality paint without too much difficulty. Oil Pastels have a very low threshold of quality- with oil pastels, you can tell very quickly whether or not you are working with artist-grade tools. If I handed you an unlabeled CrayPas and a Sennelier pastel, and asked which one was artist quality, you’d probably be able to tell the difference immediately. Low quality oil pastels are waxier/harder, high quality pastels are oilier/creamier. The cheaper it is, the more like a crayon it is. The nicer the pastel is, the closer it approaches lipstick. This is the easiest way to tell how nice your pastels are. (This is also why I waffle between using the terms “drawing” and “painting” when describing my pastel work, because sketching with the cheaper pastels feels like drawing, but gliding a Sennelier pastel over top of everything is definitelypainting.) I’ve had to assess multiple sets this way; people give me old, anonymous pastel sets in plastic bags and cookie tins, like “Oh, my great-uncle was an artist, I thought you could use these”. I always accept these gifts, because the nice thing about oil pastels is, even if you can tell a cheapo crappy pastel at 20 paces, they can still be useful to you! 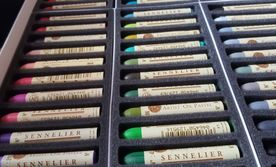 Making Oil Pastel Quality Work For You I use the old oil painting dictum of “Fat over Lean.” Lean pastels, i.e. less oily pastels, go first. Then I layer oilier pastels on top, in order of how oily/soft/creamy they are. Underpaintings get done with the cheapest pastels I’ve got, so that I can reserve nicer (more expensive) pastels for fine details and more difficult color modulations. It’s also best to layer cheap to nice for technical reasons; if you try to lay down a cheap hard pastel over a softer pastel, the hard pastel will scrape the soft one up, and you may be left with a gouge in your painting. 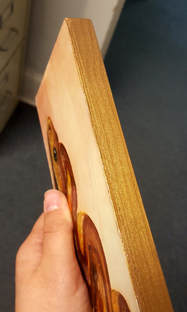 Artists Do It On Everything: Substrates and Surfaces Oil Pastel can be used on various substrates and surfaces: different kinds of paper, canvas, primed wood panel. Primed canvas is best if you’re trying to mix with oil paint or oil mediums such as stand oil, mineral spirits or other solvents. Canvas can be tricky- the texture wears down pastels very quickly, and the stretched canvas dents easily if you press too hard. Paper works best for straight oil pastel or mixing with dry media, like pen and ink or graphite. I prefer Bristol paper because it’s got enough tooth to hold the pastel but not so much as to distort the edges of the stroke, plus it can stand up to erasers. Primed wood or MDF panel is my favorite for mixed media that involves collage. I prime the board with gesso, add acrylic paint or decoupage elements, then a layer of an absorbent ground like Golden Molding Paste. It allows me to mix all kinds of media to get the effect I want, and the less-absorbent surface (compared to paper) allows me to scrape, erase and move pastel more effectively. 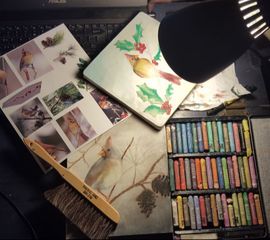 Move It All Around: Blending Oil Pastels Blending is basically the first thing you’ll need to master when using oil pastels. It’s the difference between smooth gradients and blocks of color. It allows you to create depth and shading. Oil pastel doesn’t fix itself to the paper like ink, it can be pushed around, like a much less dusty version of chalk pastels. The simplest way to blend is to use the oil pastels themselves. Lay down an area of blue, then scribble over it with yellow, voila, you got green. This works up to a certain point- after a few layers, the pastels can get too blended, or if you try to blend with a pastel that’s harder than the pastel you’ve already got on the paper, you can end up scraping it off a little. This is okay, you can always lay down more color, more on that later, but it can be a bummer if you’ve been carefully blending an area for ages. You may want to scrape some of the pastel up on purpose. The easiest way to erase oil pastels is to scrape it up so there’s less to smear. You can also use scraping to create designs, with a technique called sgrafitto. If you lay down an area of one color (say yellow) on paper, then color over it with a darker color, (brown, for instance) you can use a stylus or fingernail or other tool to scrape away the brown layer, leaving an indented yellow area. My favorite method of blending is to use my hands. I use my fingers to push colors onto clean paper, or to smear and mix two colors together. I like hands best for a number of reasons. Fingers allow me complete control over pressure, they’re slightly warm, which helps to move oil pastels around more smoothly, and they’re easy to clean off. Downsides- fingers are big, so for control over fine details, you have to be very careful. And if you have long fingernails, you may scrape some of the pastel off by accident. You can use other tools to blend. A great tool for blending precision areas is a white eraser. The eraser can easily be cleaned off, because the pastel won’t stick to the slick surface, and it can allow you to move pastel around in a very controlled manner, especially if you use a stick eraser like Sumo Grip or General’s retractable eraser. Using a stick eraser allows you to hold it like a pencil or a paintbrush, which gives most people the control they need to make small motions. Oil Pastels and Temperature Oil pastels are very temperature sensitive. It’s a property you should be aware of, because it can both help and harm. They get harder when cold and softer when warm. Softer/warmer pastels blend and smear more easily. Even cruddy pastels can be a lot more malleable on a warm day, and trying to use a set of Sennelier’s on a hot sunny day can result in melty sadness. On the other end of the spectrum, chilly temps make even nice pastels a little stiff. You can use a hairdryer or heat pad can gently warm pastels to the right temperature to blend the way you’d like them to, and having a fridge nearby allows you to cool-set overworked over-warmed pastels so that you can layer on top.  When You’re Done
When oil pastels are finished, the best way to protect and display them is to frame them. You can spray with Senellier’s Oil Pastel Fixative to give it a little extra protection- Other fixatives don’t work too well, but there’s really no need: after they are used oil pastels tend to set, so there’s none of the unintentional brushing of color that can happen with a chalk pastel or charcoal. Framing oil pastels is just like framing other dry media- glass should not touch the artwork, and there’s no need to use a raised mat (a common precaution with chalk pastels). If you’re storing an unframed oil pastel, putting a sheet of glassine (a kind of archival waxed paper) on top will keep gouges and color transfer from occurring. And That’s How It Works! There you have a brief (well, okay, not even slightly brief) intro to Oil Pastel techniques and tricks. Because of how under-utilized the medium is, most oil pastel artists are, to some degree, self-taught, but I hope this answers some of the basic questions you might have. If you are looking for more info, I highly recommend picking up a copy of Ken Leslie’s excellent book “Oil Pastel: Materials and Techniques for Today’s Artist.” Ultimately, however, the best way to learn about Oil Pastels is to try them yourself! Feel free to ask any questions in the comments; I’d be happy to answer!
1 Comment
Howard
2/13/2024 03:22:37 pm
I hope as well I recently bought two sets of oil pastels the cheapest one was Pentel and then a set of cray-pas specialist the problem I'm having is that neither of these seems blend like all the videos I watch unless I put such a huge thick layer in which case I'm using up half the pastel to begin with is it just the cheapness of The Pastels I'm using thanks so much Leave a Reply. |
AboutThoughts, feelings, opinions and lessons about oil pastels, art retail, and other artist's concerns. ArchivesCategories
All
|
 RSS Feed